How to Defend your Defenses
| Average | Decent | Best |
|---|---|---|
 |
 |
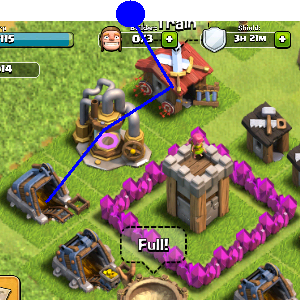 |
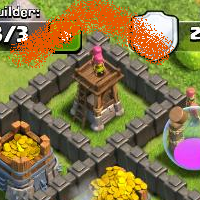
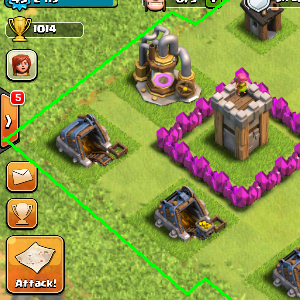
| Enemies spawning in this orange area will auto-attack the archer tower right away! Eightarchers or so will easily kill thisturret. | Enemies have to spawn outside of this green box, and can’t immediately attack theturret. | An archer placed at the blue dot will attack the buildings in the order seen. |
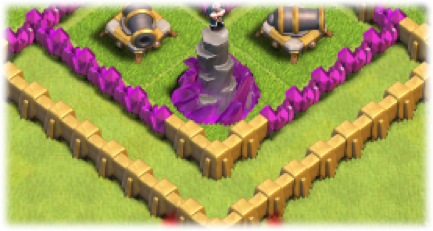
Walls are good, but are not the only part in a super awesome base. The #1 mistake I see new players (or not so new players) doing is placing their defenses so they can be targeted by archers spawning outside of the walls. Don’t make this mistake.
The difference between ‘Decent’ and ‘Great’ has to do with the way units decide which building to attack next. It is too complicated to get into here (this ‘basics’ section) but I think I’ll cover it later in more detail. The buildings protecting your defenses do matter – Mines/collectors will have more HP than Barracks/Builder’s Huts.
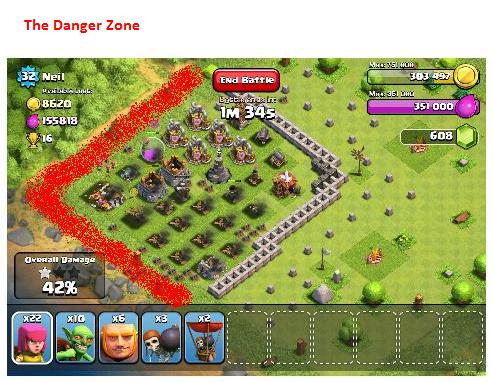
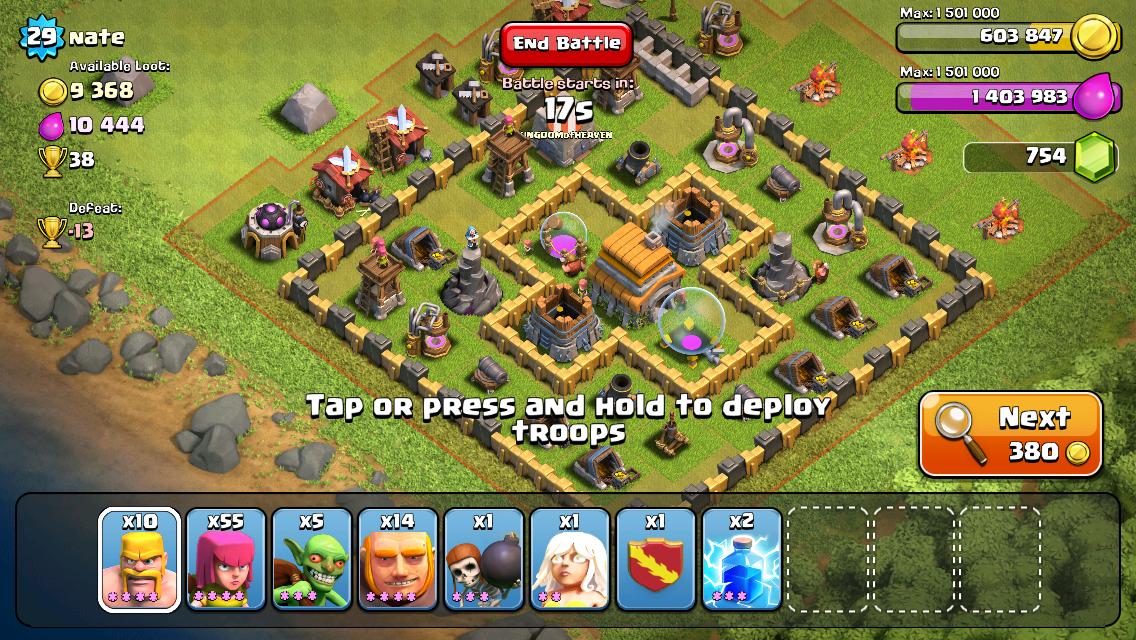
Oh Gosh! Enemies Can Spawn There Too?!
| Not good! | Unless it’s your enemy! |
|---|---|
 |
 |
Yes, enemies can spawn around the ring of your base. No, you can’t build there to stop them.
Holes in bases are bad, mmk?
When you move any building or wall (but not decorations), it shows you white lines one space larger in every direction from that building. This is showing you where enemies can spawn. Make sure you don’t have any holes in your base to let them spawn inside your walls. That would be bad. I will write about how to leave intentional spawn spots in your base later, in the advanced base defense chapter.
Overlapping Defenses
Another common mistake: placing all of your defenses widely spread apart, to cover as many buildings as possible. Dies very easily to several giants. Or to groups of infantry, especially archers. Or to balloons. Which I guess means it just dies to everything.
This often goes along with trying to stuff everything inside your walls, covered later.
Splash Damage: It’s your friend!
Mortars (and later Wizard Towers) are your first and last line of defense against mass infantry attacks. A mortar’s damage is only limited by how many troops your enemy puts down and how well you funnel them into where you want them. A fully upgraded mortar (level 7, total cost 6,952,000 gold) will do 55 damage in one shot to the units within the splash zone. In the same amount of time (5 seconds) an Archer Tower (level 1, total cost 1,000 gold) will do 55 damage to the unit it is targeting. What does this mean? It means you need to make sure your splash damage defenses are hitting enemies in groups and are protected. How do you get them to hit enemies in groups? Put them in the middle of your base – As soon as the enemy destroys a wall and funnels through it, they will be nice and bunched up for the mortars.
Where should I place my Mortar?
Somewhere very protected. Probably in the middle of your base, ideally with its own wall around it for the mortar is unable to attack at close range.
Where should I place my Air Defense?
In the middle of your base. Mass air attacks are rare (due to time to train), but not unheard of. A single, upgradedAir Defense is a wonderful deterrent, but it should be placed in the middle of your base. More specifically, it should be placed such that, if a mass balloon attack comes, It won’t be the first, second, or third defense they kill.
Don’t try to stuff everything inside your walls
As a counterpoint to Overlapping Defenses, don’t try to enclose everything within your walls. First off you will often breakOverlapping Defenses and Defend your Defenses by trying to cover everything, but secondly it is just a waste of walls. Double thick walls are better than a massive single thick wall.
What should I keep outside my walls?
Absolutely keep your Builder’s Huts, Laboratory,Barracks, Army Camps and Spell Factory outside your walls. None of these matter if they get destroyed – no progress or resources are lost. Next, I would keep out Gold Mines and Elixir Collectors. Each of these has some consequence if they get attacked: Mines and Collectors can have resources stolen (but only uncollected resources). Some people really like keeping Mines/Collectors inside – It depends on how often you play. If you do keep any inside, make sure they are your highest-level units.
What does that leave? Town Hall, defenses, Elixir Storage, Gold Storage. All of these should be inside your walls, and as well-protected as possible. If you are at a stage in the game where you don’t care about trophies, you can also kick your Town Hall outside the walls. You will be easy to defeat, but if you’re only trying to protect your resources, the Town Hall takes up a lot of space.
Is making the base square or rectangle hard for other players?
No, it’s not. I personally find bases with square or rectangle bases easy to destroy, because there aren’t any extra walls that are going to be the obstacles in my way. One or two wall breaker can easily breach through. If you have extra walls, use them for making it more difficult for players. You should put your base into a maze or with lots of layers. Wall breakers will also go for walls that are connected with at least three other walls. This means placing walls that stick out of the perimeter will be focused first.
How to build a base: From Start to Finish
This series of videos shows me building a base when Town Hall Level 4. I explain what I am thinking all along the way, from major design decisions (what should I put down first?) to more minor ones (where should my highest and lowest level walls go?). This is a 3-part base build. The important thing to learn here is not the end result (the base build), but the process I go thru to get there. We learn how to think in this set of videos.
Part 1
 2-2 Part 1 3 – Let’s Play Clash of Clans – Going for Gold (Gameplay Commentary)(13:36)
30,365 views
Part 2
 2-2 Part 2 3 Let’s Play Clash of Clans – Base Design (TH5) Spiral Base (Gameplay Commentary)-0(31:07)
Part 3
 2-2 Part 3 3 Let’s Play Clash of Clans – Santa Bombing Run Inbound! (Gameplay Commentary)(18:20)
Are you a tempting target?
The best way to not get attacked is to not make it worth your attacker’s time. There are several things that an attacker will likely attack to get, or not attack due to the presence of.
Large amounts of Loot!
Loot is the #1 reason people will attack at low levels. If you don’t have much to steal, you’re safe! Spend as much as you can on walls prior to starting any upgrade. Spend on removing obstacles when the builder is available. If you don’t have a worker available, start a research project in the Laboratory (elixir ) or buy decorations (gold and elixir). Note that gold not collected (in Gold Mine or Elixir Collector ) can be stolen. Other ways to spend resources – Queuing units (even when your army camps are full), building spells, starting research, buying defenses(bombs/spring traps ), buying decorations (flowers and flags).
Having easily accessible loot
Accessible loot comes in two types – accessible mines/collectors and accessible storage. Both are bad. Make sure your storage is either empty or in the middle of your base. Make sure your mines/collectors are next to your walls (and therefore next to your defenses). Uncollected resources are easier to steal than collected ones – the buildings are more spread out and the buildings have lower HP.
You should also intermix your elixir collections and mines as well as your elixir storage and gold storage . If an opponent really wants your gold, and all of your mines are together in a nice line, it is much more tempting of a target as not as much needs to be invested to steal the single resource they are seeking. Similarly, make sure your two gold storage are not next to one another.
Looking like your base is difficult
Upgrade your walls as a high level as you can, the higher the level the more difficult it looks for players at your trophy level. Do not upgrade willy-nilly, upgrade each one, one-by-one, even though it’s a pain.
Having a Good Base
See Flammy’s Base Defense Basics for details (Common issues: not protecting your defenses, mortar and air defense placement, everything-inside-walls issue, spread out defenses). Also having defenses that are significantly below the ‘normal’ upgraded amount for your trophy count/level. Here are a few more common bases and what I think of each.
The Standard Base
The standard base follows all of the rules laid out in Flammy’s Base Defense Basics – Defenses and storage inside of the walls; army camps, barracks, mines, extractors, etc. outside of the walls. There is a single wall dividing your precious base from the hordes of horrors outside. Now What? How can you improve your base? Well this standard base is weak to giants as once they breach your wall, they can attack all of your defenses without delay. It is also weak to mass goblin attacks for the same reason – Once inside they can often outrun splash damage and steal all of your goodies, possibly leaving you with a victory, but with much less resources to spend.
The Pocketed Base
This base has the town hall in the center, and every defense around it is surrounded by its own 4×4 wall. They are good against giants as the walls slow them down, whilst keeping the defenses close together. They are best attacked with giants and archer support.
The Large Pocketed Base
This base is a variant on the pocketed base, where each pocket has 2-3 structures in each pocket. It is more efficient in terms of wall usage than the pocketed base, allowing for more buildings to be placed within the walls. People who love symmetry in their bases will like the 3 pocket base, as it creates a nice spiral with no wasted space or walls. The differences between this and the Pocketed Base are minimal. This base type is more common than the Pocketed Base at lower levels due to lack of walls.
The Bulkhead Base
A Bulkhead Base follows the rules laid down in Flammy’s Base Defense Basics about kicking un-needed buildings outside of the walls, then uses extra walls to segment defenses into different sections allowing for greater protection in case one section is breached (especially by giants). Bulkheads are used in large boats to prevent the entire boat from sinking in case of a leak below the waterline – The flooded sections are closed off via built in bulkheads, containing the flooding to only the affected sections. In the same way, bases use this strategy to contain (or slow) the flood of enemy troops to the breached bulkhead – Where as with a single wall a breach would mean your village is headed to destruction.
The Split Base
A common (but poor) base defense strategy is grouping your defenses into two groups, with critical non-defensive buildings between them (Town Hall, Resource Storage). This defensive strategy seems to not violate the rules I’ve put in Flammy’s Base Defense Basics, but it actually violates the rule of not keeping your defenses too spread out. Your defenses should be able to cover each other, ideally as much as possible – keeping them in two groups should be avoided. A split base defense is very vulnerable to giant attacks as they can clean up half of the defenses without taking fire from the other half. Split bases also mean that if either side is wiped out, your critical buildings in the center are very vulnerable to a few archers attacking from that side, effectively meaning your base is half as weak as otherwise.
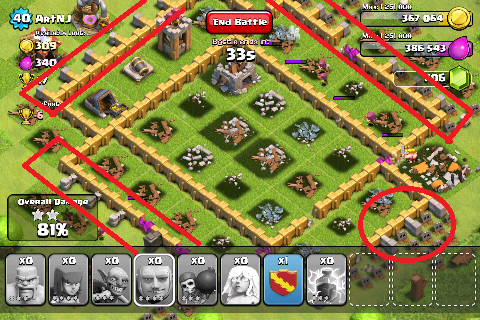
Funneling for Victory
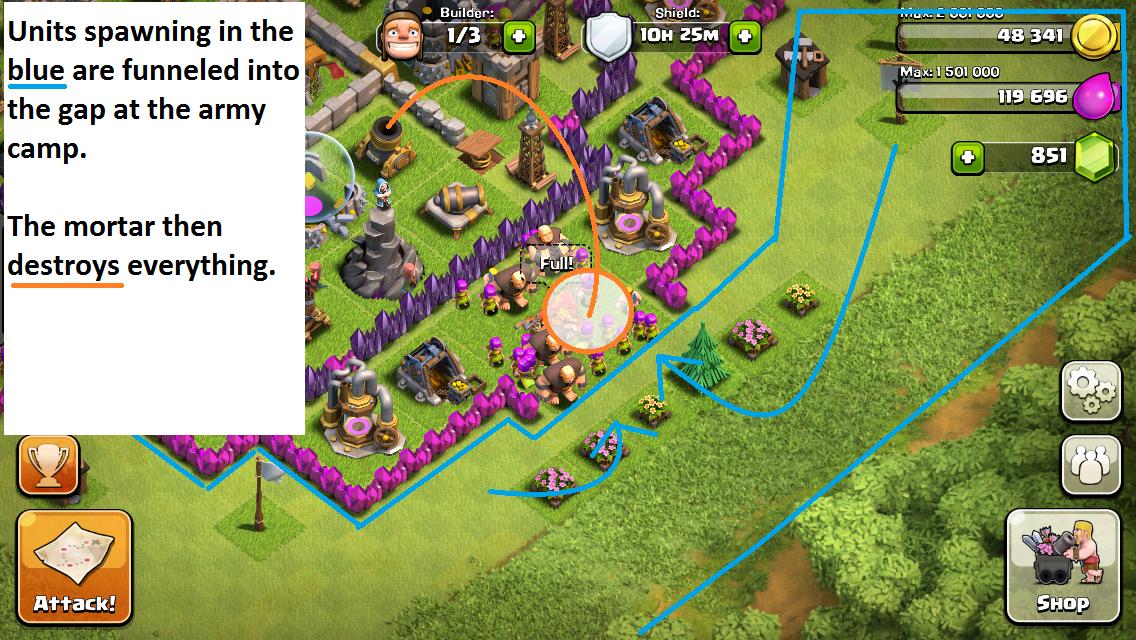
Funneling is critical to getting the best results out of your splash damage dealing turrets. It basically means using buildings (mostly walls) to make your enemy go where you want it to go, and then die as you want it to die.
The image to the right shows how my current base funnels enemies.

Do I need to say more? Funneling is also critical to proper trap usage. See Placing Traps, below.
Upgrading multiple defenses at the same time
Your defenses don’t attack if they’re in the middle of being upgraded when you’re attacked! Try not to be upgrading 40% of your defenses at the same time. This is doubly true for splash damage buildings (mortar, wizard tower ) andair defense .
Having a glaring flaw in your base
Such as a spawn point where you moved a turret out of but didn’t put anything back. Or not having an air defense turret. Or putting your air defense turret outside of your walls.
Buildings outside walls are too spread out
At higher levels, more players start caring about trophies. If an attacker sees your base is easy to 1-star (kill 50% of the buildings) without having to place too many troops they will see you as a good target. Keep your buildings close to your walls (and defenses) to prevent this, if you care about maintaining your trophy count.
Turret Range Considerations
What can your towers defend? One of the goals of placing less valuable buildings outside of your walls is to slow down your attackers once they are within range of your defenses. NOT to make them spawn farther back – This is of secondary priority. This section covers what that range actually means. Range in this game is also sorta screwed up – Sometimes a turret will decide it can attack a unit standing in a given square, but on another base (with identical unit and turret placement) it won’t attack. This ambiguity is why it has taken me about 2 weeks longer to post Chapter 2 than I was hoping. I still haven’t figured out why it does this.
What can and can’t be attacked without taking return fire is summarized in these pics.
Cannon– Range 9;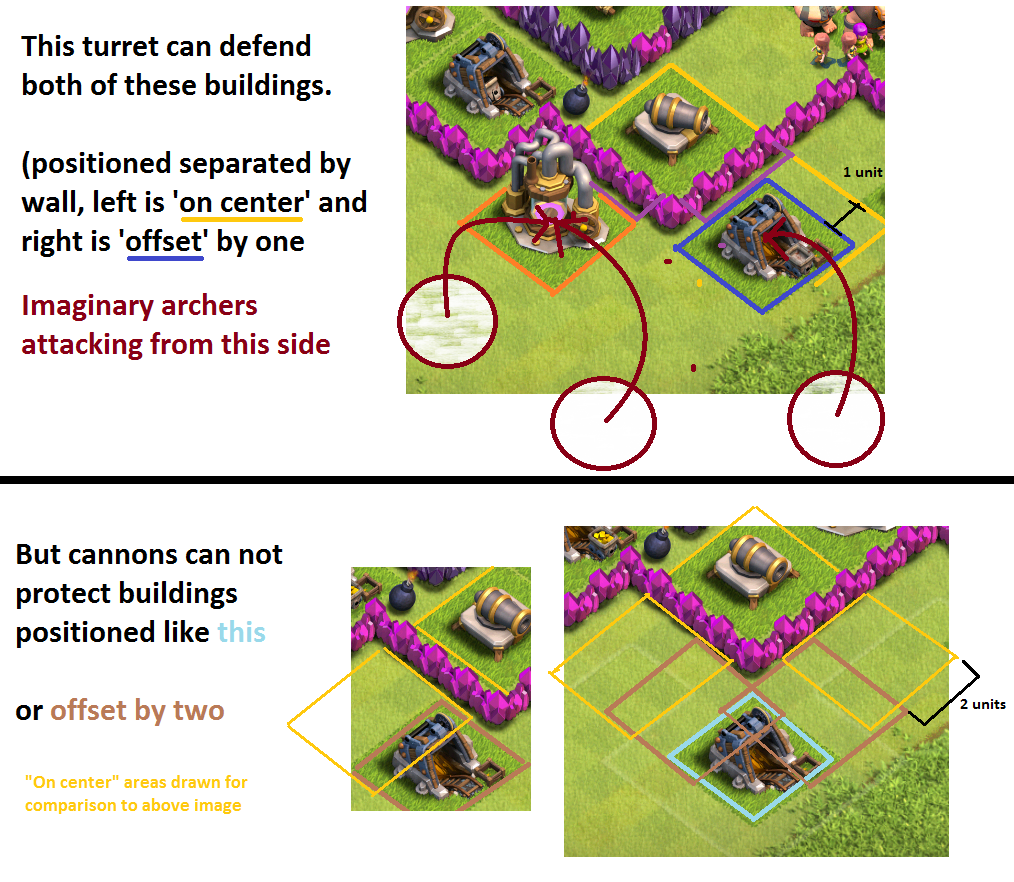
Archer Tower– Range 10; 
Archer – Range 4.
Spawn Forcing
Spawn forcing refers to forcing your opponent to spawn further away from your important buildings, or your base in general. The objective is to attempt to persuade your opponent to attack from a different side of your base and to delay their reaction time (placing reinforcements). You can create this gap outside of your base by arranging your exterior buildings, placing extra walls, placing decorations and utilizing natural decorations. It is not recommended to use buildings to force your opponent to spawn further away, as buildings are more useful to delay your opponent once they are in range of your turrets. However, if you spread out your walls in singles (optimal distribution to create a large no-spawn-zone) wall breakers will never attack them. Spawn forcing allows your defenses to kill many wall breakers before they get to your walls if they are unsupported. For other wall breaker defense tips, see decoy walls below. If allowed to spawn directly next to your wall, wall breakers are able to detonate before turrets can strike, even if the wall breaker would normally be one hit by the turret.
Trick Spawns
Trick spawns are ‘mistakes’ in a spawn forcing situation. Usually a single hole, they are closer to the center of your base than the rest of the spawn force allows. However, they are intentional and you should make sure you have turrets (especially mortars ) barely within range of the spawn square in question.
Why use trick spawns?
Spawn tricks are fun (I’ve had an opponent put down 31 archers in a trick spawn just to have them all die to a single mortar hit – they didn’t opt to continue attacking). Normally they don’t matter but occasionally they help. If created without care, they can allow your opponent an advantage (such as if they can deploy wall breakers). It is inadvisable to rely on traps to defend a trick spawn – if you get attacked twice in a row they won’t be there the second time, plus a smart attacker will place a single unit in the square in question to test for traps.
Messing with Wall Breakers
Wall breakers are often used in conjunction with giants to get them through the outer walls faster. Here are a few tips to mess with the Wall Breaker AI.
Decoy Walls
Decoy walls are segments of walls of at least 8 that wall breakers will target if they are closer than your real walls. They can also be used to funnel archers and barbarians into taking lots of splash damage from mortars and wizard towers. Segments of 7 or less don’t seem to work most of the time (seems to be partially based on spawn proximity). If you do further testing and discover any additional details, please report back (for science).
Outer walls with Buttresses
When used in game they look like this. The wall breaker will attack the buttress rather than the walls. Giants will ignore them and proceed straight to the inner walls. Only once the nearby buttress is destroyed will the Wall Breaker target the main wall. This works especially well with spawn forcing, as the farther away the wall breakers spawns the more likely they will target several buttresses, rather than several targeting one buttress and then the surviving ones re-targeting onto the main wall. They can also be combined with Decoy Walls – See pictures of my base in the funneling section for how I use them in such a situation.
If you’re curious about the name, see here. Note: no longer works as of March 12, 2013 update.
Using extra walls for Buffering
Visual of buffering If you have extra walls, you can also use them to protect your defenses from archers by extending the distance between you turret and the offensive units. They simply prevent archers from getting close enough to fire, however they do cut down on the number of buildings outside the wall your turret can protect so I generally only recommend this for situations where you: 1) DON’T want archers attacking from, 2) have walls to spare, and 3) don’t have buildings which can defend your turret instead. This situation can be considered the advanced method of ‘Defending your Defenses’ (from Flammy’s Base Defense Basics) but is generally not viable to lower level players due to the number of walls necessary.
Upgrading walls
Walls should be upgraded in the order that they get attacked, generally outside towards inside. I generally discourage placing walls right around your Town Hall in the center of your base – If the enemy gets that far you are dead anyway. This also explains why your best walls shouldn’t be in the center of your base. Rather, upgrade your critical junction walls first – walls that are shared between more than two pockets. (Read The Pocketed Base ; if you don’t get what I mean by pockets) as well as exterior corners (due to wall breakers). Lastly upgrade walls that are likely to be attacked by giants going after your defenses – namely the walls just outside of the defenses themselves. I am not saying you shouldn’t upgrade all of your walls, just that you should focus on them in this order.
Oh, and DO NOT upgrade your walls in a polka dot manner.
See image on right.
There is no point. Wall breakers will damage three or so walls at a time, so the ‘weak’ wall will be hit just like the strong one.
Placing Traps
Place traps where enemies will be funneled into them. Don’t spread them out randomly, that just wastes money. Don’t place them in a predictable pattern – If I am attacking a base and hit two traps close to one another, I will deploy a few singleton troops where I would expect further traps to be just to clear them out. Do you really want to waste 4 bombs in a row on one barbarian? Or a spring trap on a single archer because you placed them evenly on one side of your base?
Don’t place your traps in an ‘entrance’ gap in your walls like the image to the right. Even worse is an entrance hall – It is blindly obvious thing to do and a single goblin running down your entrance hall will trigger every bomb and spring trap and escape unharmed. Then you’ve just spent several thousand gold for no real reward.
Here is how I use traps in my base.

Clan Castle Placement
Clan Castle reinforcement troops will be deployed once the enemy enters the Clan Castle’s range. The troops will then jump and fly out over the walls to attack the enemy. The Clan Castle troops will target whoever activated them first, even if other units are closer on their way after their target. This section is rather long as many people don’t use the Clan Castle properly. The Clan Castle can be most effectively used with a Standard Base or a Bulkhead Base using the following method:
The best use of your reinforcements is to delay your enemy while your defensive structures attack them. Because both the reinforcements and the attacking troops will only target one unit (50 enemy archers will all target the first reinforcement archer, all fire on her, leaving the other 9 units unhurt). This means your 10 (or more!) reinforcements can delay enemies for a very long time while they are slowly targeted down one by one. When used in this manner the level of the troops doesn’t matter, as once they are targeted they are usually hit by 50 arrows which is enough to kill both a level 1 archer and a level 5 archer. When used this way, this also means having 5 archers or 5 barbariansis much better than having 1 giant. While the giant has more health, it takes less volleys to kill than 5 individual archers, effectively delaying the enemy for less time despite its higher health. This makes the positioning of your clan castle especially important. Note bulkhead bases may want to leave a hole (http://i.imgur.com/AiCcC.png) for the reinforcements to move though, depending on design. If you leave a hole like this, try to also leave a spring trap in it! The only thing you shouldn’t do for sure is place your clan castle in a partition by itself.
Finally, you should be aware that reinforcement troops can be killed by your own spring traps if the enemy triggers them while the reinforcements are standing on them. So don’t place spring traps around your Clan Castle, especially if it is outside of the walls. The same is NOT true for bombs and giant bombs.
Tips and Tricks for Base Defense
- Place turrets under construction in places that Giants might notice them and get distracted attacking (Like just outside your walls in range of your active defenses ).
- Enemies can’t spawn on decorations, or natural elements (trees, bushes, rocks), or on top of hidden teslacoils, despite the area under them showing as ‘spawnable’ (in the case of Teslas, this can be rather confusing as there appears to be nothing there. Once the Tesla is destroyed, the area under it becomes free and units can be spawned on it! But don’t worry too much, hidden Tesla’s cannot be taken out by spells as long as they are hidden).
- Hide a building in the corner of the map to possibly save yourself from getting 3 starred if the attacker is running out of time. Placing more than 2 is probably overkill, but you could place one in each corner if you really really care about it.
- Enemies can walk across decorations and natural elements – Don’t use them as part of your wall!
- Be sure to request troops and keep your clan castle full, the troops will be deployed in case of an attack.
- Review bases for others around your level by “visiting” them – If you like a design, steal it! Viewing allies in yourclan will show you their trap locations as well.
- Reinforcements from the Clan Castle can die from allied spring traps if they are in the wrong place when the trap happens to be triggered. 😦
Defense costs and ability –
